BluetoothLED
STEP1: Download Serial Bluetooth Terminal app from PlayStore
STEP2: Also Configure the app as per requirements
STEP3: Connect the ESP32 to your mobile
STEP4: Download the code from computer to ESP32
STEP5: Type a or b in SBT app (in program, it is written as a= LED ON, b=LED OFF); Observe the LED being on or off.
STEP1: ESP32 is an Arduino that has inbuilt a Bluetooth and WiFi.
Connections as per below diagram:
STEP2: Serial Bluetooth Terminal App
(PlayStore Download----> LINK)
Configure the App:
>>>> Open phone bluetooth settings and pair ESP32 device
>>>>In the app:
click on Menu
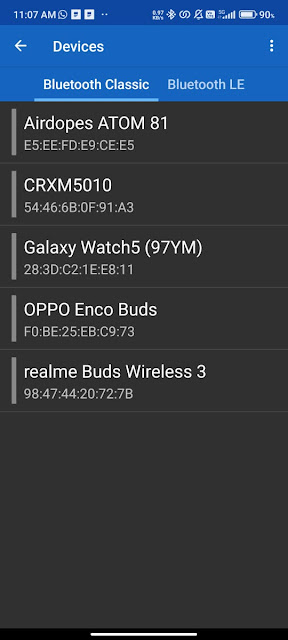
>>>> Devices
>>>>REFRESH ---> Allow
>>>>
The split symbol means DISCONNECT
STEP3: Arduino Code:
#include "BluetoothSerial.h"
#if !defined(CONFIG_BT_ENABLED) || !defined(CONFIG_BLUEDROID_ENABLED)
#error Bluetooth is not enabled! Please run `make menuconfig` to and enable it
#endif
#if !defined(CONFIG_BT_ENABLED) || !defined(CONFIG_BLUEDROID_ENABLED)
#error Bluetooth is not enabled! Please run `make menuconfig` to and enable it
#endif
BluetoothSerial SerialBT;
int received;// received value will be stored in this variable
char receivedChar;// received value will be stored as CHAR in this variable
const char turnON ='a';
const char turnOFF ='b';
const int LEDpin = 32;
int received;// received value will be stored in this variable
char receivedChar;// received value will be stored as CHAR in this variable
const char turnON ='a';
const char turnOFF ='b';
const int LEDpin = 32;
void setup() {
Serial.begin(115200);
SerialBT.begin("Welcome to ESP32"); //Print on App....the Bluetooth device name
Serial.println("device started, now pair it with bluetooth!");
Serial.println("To turn ON send: a");//print on serial monitor
Serial.println("To turn OFF send: b");
pinMode(LEDpin, OUTPUT);
}
Serial.begin(115200);
SerialBT.begin("Welcome to ESP32"); //Print on App....the Bluetooth device name
Serial.println("device started, now pair it with bluetooth!");
Serial.println("To turn ON send: a");//print on serial monitor
Serial.println("To turn OFF send: b");
pinMode(LEDpin, OUTPUT);
}
void loop() {
receivedChar =(char)SerialBT.read();
if (Serial.available()) {
SerialBT.write(Serial.read());
}
if (SerialBT.available()) {
SerialBT.print("Received:");// write on BT app
SerialBT.println(receivedChar);// write on BT app
Serial.print ("Received:");//print on serial monitor
Serial.println(receivedChar);//print on serial monitor
//SerialBT.println(receivedChar);//print on the app
//SerialBT.write(receivedChar); //print on the app
if(receivedChar == turnON)
{
SerialBT.println("LED ON:");// write on BT app
Serial.println("LED ON:");//write on serial monitor
digitalWrite(LEDpin, HIGH);// turn the LED ON
}
if(receivedChar == turnOFF)
{
SerialBT.println("LED OFF:");// write on BT app
Serial.println("LED OFF:");//write on serial monitor
digitalWrite(LEDpin, LOW);// turn the LED ON
}
}
delay(20);
}
Step-4: Working
to make LED ON: type a in the blank provided
About the Code:
/*
* Turn LED ON or OFF from your phone
*
* Using ESP32's Bluetooth and Mobile app
* turn ON and OFF LED
*
* Updated/Written by Ahmad Shamshiri
* On August 25, 2019 in Ajax, Ontario, Canada
* Watch video instruction for this cod:
* https://youtu.be/4OOFlS75owA
* www.Robojax.com
*
Get this code and other Arduino codes from Robojax.com
Learn Arduino step by step in structured course with all material, wiring diagram and library
all in once place. Purchase My course on Udemy.com http://robojax.com/L/?id=62
If you found this tutorial helpful, please support me so I can continue creating
content like this. You can support me on Patreon http://robojax.com/L/?id=63
or make donation using PayPal http://robojax.com/L/?id=64
* * This code is "AS IS" without warranty or liability. Free to be used as long as you keep this note intact.*
* This code has been download from Robojax.com
This program is free software: you can redistribute it and/or modify
it under the terms of the GNU General Public License as published by
the Free Software Foundation, either version 3 of the License, or
(at your option) any later version.
This program is distributed in the hope that it will be useful,
but WITHOUT ANY WARRANTY; without even the implied warranty of
MERCHANTABILITY or FITNESS FOR A PARTICULAR PURPOSE. See the
GNU General Public License for more details.
You should have received a copy of the GNU General Public License
along with this program. If not, see <https://www.gnu.org/licenses/>.
*/
//This example code is in the Public Domain (or CC0 licensed, at your option.)
//By Evandro Copercini - 2018
//
//This example creates a bridge between Serial and Classical Bluetooth (SPP)
//and also demonstrate that SerialBT have the same functionalities of a normal Serial
About ESP32 and ESP8266:
ESP32:
Step1: Tools ---> Boards ---> Board Manager
Step2:
Step3:
Step4: after installation it shows as below
Step5:
Check for port like this: open Device Manager
it must show USB to UART Bridge (COMx) here x may be like COM4, COM5....
Program to obtain MAC Address:
// Complete Instructions to Get and Change ESP MAC Address: https://RandomNerdTutorials.com/get-change-esp32-esp8266-mac-address-arduino/
#ifdef ESP32
#include <WiFi.h>
#else
#include <ESP8266WiFi.h>
#endif
void setup(){
Serial.begin(115200);
Serial.println();
Serial.print("ESP Board MAC Address: ");
Serial.println(WiFi.macAddress());
}
void loop(){
}
Program to set ESP32 with a Custom name -Link
>>>> default name may be shown as espressif OR ESP32 OR some other name
So to configure it, and show it as KRISHNA's ESP32 , you need to program as follows:
#include <WiFi.h>
// Replace with your network credentials (STATION)
const char* ssid = "REPLACE_WITH_YOUR_SSID";
const char* password = "REPLACE_WITH_YOUR_PASSWORD";
String hostname = "ESP32 Node Temperature";
void initWiFi() {
WiFi.mode(WIFI_STA);
WiFi.config(INADDR_NONE, INADDR_NONE, INADDR_NONE, INADDR_NONE);
WiFi.setHostname(hostname.c_str()); //define hostname
//wifi_station_set_hostname( hostname.c_str() );
WiFi.begin(ssid, password);
Serial.print("Connecting to WiFi ..");
while (WiFi.status() != WL_CONNECTED) {
Serial.print('.');
delay(1000);
}
Serial.println(WiFi.localIP());
}
void setup() {
Serial.begin(115200);
initWiFi();
Serial.print("RRSI: ");
Serial.println(WiFi.RSSI());
}
void loop() {
// put your main code here, to run repeatedly:
}
References:
1. Control Multiple LEDs using Bluetooth - Link


